On a typical timber shed — the kind found behind terraced homes across Grimsby, Cleethorpes and Immingham — those screws may be the only thing holding the door to its frame. A screwdriver can turn a respectable-looking shed into a much easier target than the padlock suggests.
The padlock may remain closed while the door is defeated. If the hinges or hasp are attached only with short wood screws, an intruder may not need to attack the lock at all. The door can be lifted, pulled or levered away from its fittings, leaving the lock securing an empty hole.
That distinction matters because shed security is often approached from the wrong end. Owners buy a heavier padlock, then leave the hasp, hinges and contents of the shed attached to weak timber. The lock is improved; the structure around it is not.
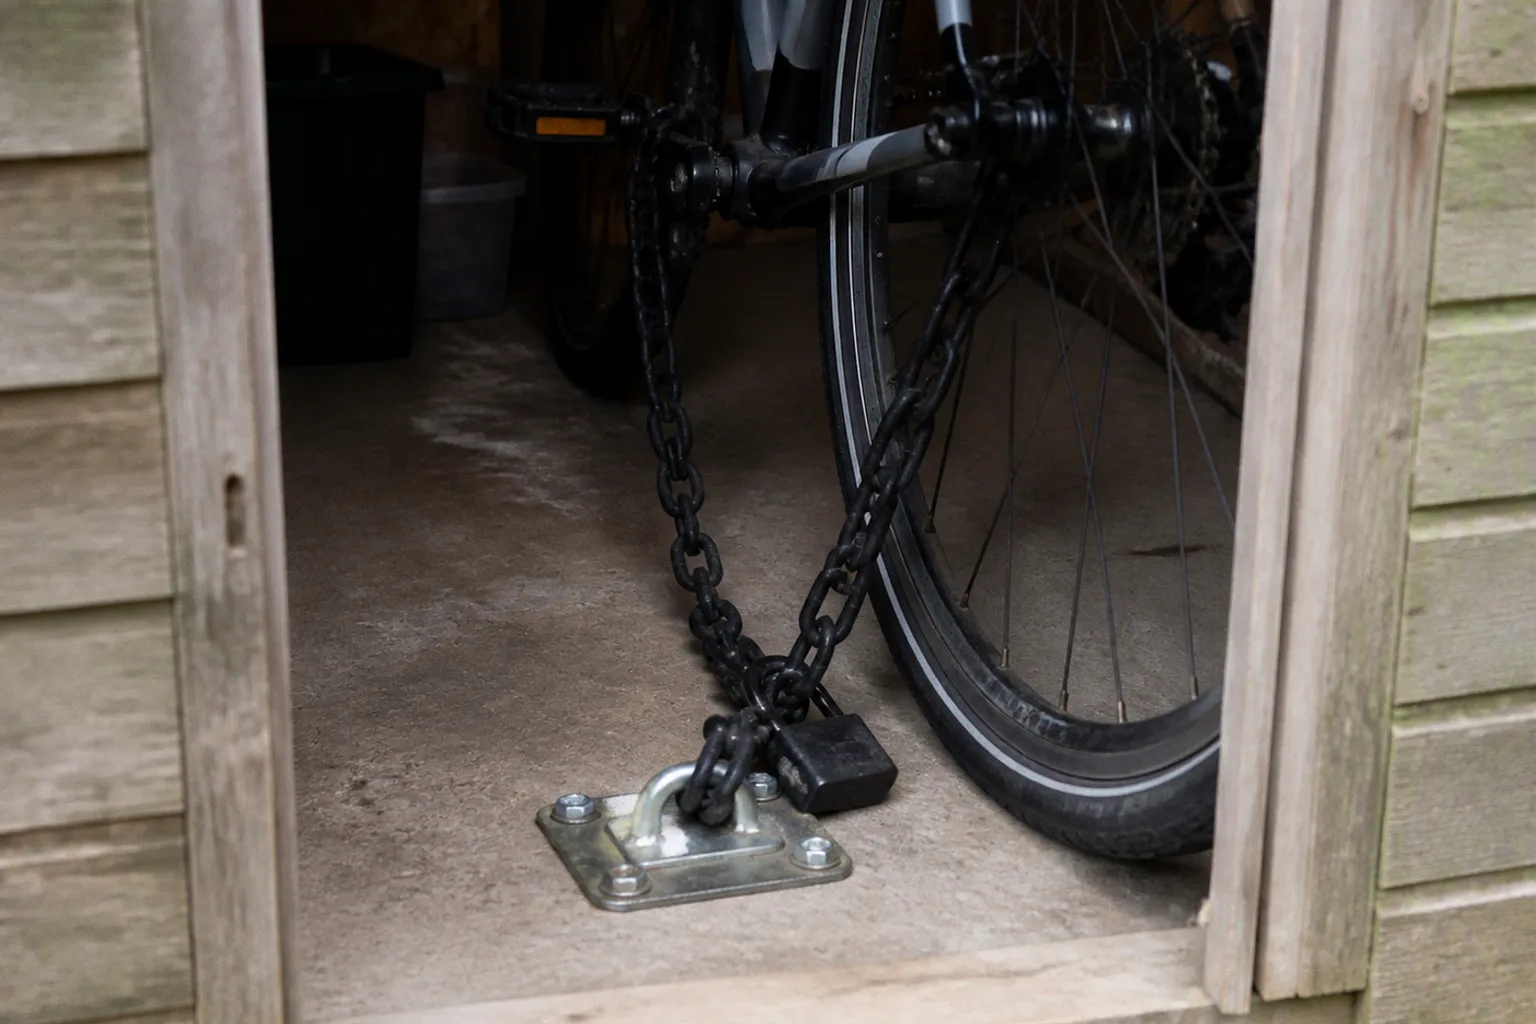
A useful way to understand the difference is to imagine a hypothetical Cleethorpes shed. The door has been forced, but a bike inside is still held by its chain. A ground anchor was installed some time earlier, almost as an afterthought. The bike can be moved only as far as the chain allows, and the intruder abandons it rather than spending longer in the garden trying to defeat the anchor.
That is the point of the example. The anchor is not there to make the shed impossible to enter. It connects the security chain to something stronger than the shed itself, so getting through the door does not automatically mean getting away with the most valuable item.
The reality of outbuilding theft in North East Lincolnshire
Outbuilding theft rarely receives the attention given to a house burglary, but the contents are often easy to identify, easy to carry and relatively easy to resell. Garden sheds, detached garages and converted outbuildings can contain bikes, cordless tools, mowers, fishing equipment, ladders and motorbike parts. Many are stored behind a lock that looks substantial from the garden path but is fixed into lightweight timber.
That combination creates a familiar pattern. The thief is not necessarily trying to dismantle the entire shed or remove every object inside it. They are looking for the simplest weak point:
- a hinge fixed with short screws;
- a hasp screwed into the face of a thin door;
- a window hidden behind a fence;
- a chain that is strong but not attached to the ground;
- tools and bikes left close to the door;
- a rear gate that provides discreet access from an alley.
The layout of many properties in the area makes this worth considering. Rear-access alleys, shared paths and garden boundaries can give an intruder time to examine a shed without being visible from the main road. A shed at the end of a long garden is not automatically safer than one beside a house. In some cases, the distance from the house simply gives a thief more privacy.
The loss is also more than the replacement value of a single object. A stolen bike may be the family’s transport, a commuting tool or a significant leisure purchase. A collection of cordless tools can be worth far more than the owner expects when each item is added together. The same applies to a mower, pressure washer or generator that was bought gradually and stored without being recorded.
Recovery is uncertain once property leaves the garden. Serial numbers, photographs and forensic marking can improve the chances of identification, but they do not replace physical security. The useful question is not whether a determined criminal could eventually defeat the shed. It is whether the first obvious attack will produce a quick, quiet result.
A padlock secures a door. A ground anchor secures the decision not to carry what is behind it away.
This is why shed burglary prevention in Grimsby and the surrounding area should be treated as a layered problem. The door needs to resist entry, the perimeter needs to make access awkward, and valuable items need to be attached to something that cannot simply be lifted out with them.
Why standard wooden sheds fail against determined intruders
Most budget timber sheds are built to keep out rain, leaves and casual interference. They are not designed as secure stores. That does not make them useless, but it does mean the supplied fittings should be treated as the starting point rather than the finished security system.
Hinges are often the quietest route in
Externally mounted hinges are convenient for the manufacturer and familiar to the buyer. They are also easy to inspect from outside. If the screws are visible and bite only into the edge of the door or frame, the hinge may offer little resistance once an intruder starts working on it.
The problem is not simply the length of an individual screw. Timber can split, compress or pull away around a fixing, particularly where the door has been opened repeatedly or the frame has absorbed moisture. A screw that felt tight during installation may no longer have the same grip after several winters.
Security screws with non-return heads can make removal less straightforward. Through-bolting is stronger again where the construction allows it: the fixing passes through the door or frame and is secured on the protected side. The inside nut should not be reachable while the door is closed, and the bolt should be selected for the timber and hardware rather than added without checking clearance.
It is worth opening and closing the door after any reinforcement. A bolt head that catches on the frame, or a plate that stops the door sitting squarely, will eventually become a reason to leave the repair unfinished. Security hardware has to work in the conditions of an actual garden, including damp timber and seasonal movement.
The supplied hasp is rarely the strongest part of the shed
A hasp and staple can look reassuring because the padlock is visible. The weakness is usually behind the metal plate. Short screws driven into the door face and frame may hold the fitting in place during normal use but provide poor resistance against levering or sideways force.
A security hasp with through-bolts and an internal backing plate spreads the load over more of the timber. The door and frame still matter, but the intruder is no longer relying on a small group of screws gripping the outer skin of the shed.
The staple should be considered as carefully as the hasp. A robust hasp attached to a weak staple is not a balanced upgrade. Both sides of the closure need to be fixed into sound material, with the bolts protected from being turned from outside.
A shrouded hasp can also reduce the amount of lock body and shackle exposed to cutting or levering tools. It will not compensate for a rotten frame, but it limits the space available around the lock and makes a straightforward attack less convenient.
The door and walls are not a safe
Many sheds use thin boards and lightweight framing. They may be perfectly adequate for their intended purpose, but they can flex around a lock or hasp. A strong lock fitted to a weak door can concentrate the attack on the surrounding timber.
Before buying hardware, inspect the door edge, the frame and the area where the hasp will sit. If the timber is soft, cracked or too thin to take a through-bolt, the right answer may be to reinforce that area with an internal plate or timber section. In some cases, replacing or strengthening the door will do more than buying an increasingly expensive padlock.
Windows deserve the same attention. A shed window that can be reached from an alley or neighbouring garden should not be treated as harmless simply because the door is locked. A security film, internal grille or well-fixed secondary barrier may make access less attractive, provided it does not create a safety hazard for anyone who legitimately needs to use the building.
The basic principle is simple: security hardware works only when the material around it can carry the load.
Moisture is a security issue as well as a maintenance issue
Rot around the door frame changes the calculation completely. A fixing that would be useful in sound timber may have almost no holding power in a damp, softened section. Check the lower edges of the door, the threshold, the corners of the frame and any place where water collects.
Keep the ground around the shed draining properly, repair leaking guttering and avoid storing items directly against damp walls. Preserving the structure is not glamorous, but it is part of maintaining the resistance of every hinge, staple and anchor fitted to it.
Installing ground anchors: concrete bases versus shed shackles
A ground anchor is the part of the system that stops a thief from carrying the entire secured item away. It is also the component most likely to be installed badly.
The anchor must be connected to a substantial structure. A ring attached only to shed floorboards may look like an anchor, but it is not necessarily anchoring anything beyond the boards themselves. If the floor can be lifted, split or pulled away from the base, the chain and the bike may leave together.
There are two practical arrangements for most domestic sheds.
Through the floor into a concrete base
Where the shed stands on a sound concrete pad or substantial masonry base, a floor-mounted anchor can be fixed through the shed floor and into that base. The exact fastener depends on the construction and the manufacturer’s instructions. Expanding masonry bolts or resin-fixed studs may be appropriate for suitable concrete, but the condition and depth of the base must be confirmed before drilling.
The anchor should sit where the chain can reach the bike frame without creating a trip hazard or allowing the chain to rest directly on the floor. A low position can make it harder to get leverage, while a badly placed anchor can leave the chain rubbing against a sharp edge or give the thief room to swing a tool.
The concrete must be part of the security plan, not merely a thin slab laid over loose ground. A weak or shallow base may offer less resistance than its appearance suggests. If the slab is cracked, unstable or not properly connected to the ground, a professional installer may be needed to determine whether it can support an anchor.
The anchor’s position matters inside the shed. It should not be hidden behind stored boxes to the point that the owner cannot inspect it, but it should also avoid sitting immediately beside the door. A thief who gets access should not be able to reach the chain, bike and anchor in one comfortable movement.
A wall-mounted shed shackle
A wall-mounted shackle is useful where the shed sits on a timber base, a suspended floor or a location where drilling into concrete is not practical. The shackle is fixed through the rear wall or a structural frame, with bolts passing through to internal backing plates or protected external hardware.
This method transfers the load into the shed’s frame rather than the floorboards. It still depends on the quality of the timber and the way the backing plate is fitted. A shackle fixed through a thin panel without a plate can tear through the wall under force.
Use security-rated hardware where available, and match the chain and lock to the rating of the anchor. A high-grade chain attached to a weak shackle is not a high-grade system. Nor is a strong anchor useful if the chain is thin enough to become the obvious point of attack.
A wall-mounted arrangement can be practical for more than one bike, but avoid putting several chains through a single small ring if they cannot move freely. Crowding makes it harder to inspect the fittings and may create a mass of metal that can be attacked together. The installation needs to preserve both strength and access for normal use.
The arrangement to avoid
The weakest arrangement is a floor anchor bolted only into the shed’s own timber floor, with no concrete, structural frame or substantial backing beneath it. Under a sideways pull, the anchor may lift with the boards. The thief does not need to defeat the ring if the ring can be removed as part of the floor.
| Anchor method | Best suited to | What must carry the load | Main caution |
|---|---|---|---|
| Through-floor anchor | Shed on a sound concrete or masonry base | The concrete or masonry beneath the floor | Do not assume every slab is deep or stable enough |
| Wall-mounted shed shackle | Timber base, suspended floor or no practical concrete base | Structural framing and internal backing plates | Thin wall panels alone are not enough |
| Anchor fixed only to floorboards | No installation should rely on this | The shed’s own timber boards | The anchor may be pulled out with the floor |
Before drilling, check for drainage, buried services and the shed’s structural members. The chain should pass through the bicycle frame, not just the front wheel. Wheels can be removed or replaced; the frame is the part that needs to stay connected to the anchor. If more than one valuable item is stored inside, plan the layout so each can be secured without creating a pile of loose chains that can be attacked together.
The chain should be kept off the floor where possible. A chain lying in a loose loop is easier to reach with tools and may be damaged by damp, grit or repeated contact with the threshold. It should be long enough to secure the frame and close the lock without being so long that a large section hangs freely.
Hardening your perimeter: beyond the padlock
The anchor is the last line of defence. The first is the route into the garden.
Reinforce the door before upgrading the lock
Replace exposed hinge screws with security screws or through-bolts where possible. The aim is not to make removal impossible; no domestic fitting can promise that. The aim is to remove the easy, visible weakness and force an intruder to spend more time making noise.
The same applies to the hasp and staple. A security-rated fitting, coach bolts and an internal backing plate are more useful than a decorative fitting with a premium padlock hanging from it. Use shear nuts or other tamper-resistant fixings where they are suitable for the installation, but check that they can be tightened correctly and will not work loose as the timber moves.
Wood expands, contracts and absorbs moisture. Leave enough room for the door to operate in wet weather, but do not accept a large gap that lets the hasp twist or the frame flex. A door that is difficult to close is often a door that will be left unsecured.
Improve the gate as part of the shed upgrade
A strong shed at the end of an open garden is still exposed if the rear gate can be lifted off its hinges or opened with a loose latch. Check the gate from the outside as well as from the garden. Look for accessible hinge pins, gaps beneath the gate and a latch that can be manipulated through the boards.
The gate does not need to look like a commercial security barrier. It does need to make an intruder commit to a noisier and more awkward route. A lockable latch, sound hinges and a design that does not leave the lock exposed to easy attack are sensible improvements.
Where a shared alley runs behind the property, consider how the gate and shed appear from that route. Keep bins, ladders and garden furniture from creating a convenient working platform or a way to drag a bike out without using the gate.
Reduce the opportunity at the boundary
A shed that is clearly visible from a busy house window is not automatically secure, but visibility can discourage casual tampering. Conversely, a shed hidden behind a tall fence may be attractive to someone who wants privacy while working on the lock.
The most useful perimeter improvements are those that make access less convenient without creating new hiding places:
- keep the rear gate locked and make sure its hinges and latch are not weaker than the shed’s;
- repair gaps beneath or beside gates where tools or bikes can be dragged through;
- use lighting that covers the approach without shining directly into the house;
- keep shrubs trimmed where they screen the shed door from the property;
- consider a trellis or other barrier that makes climbing noisy and awkward;
- avoid leaving ladders, bins or garden furniture beside the fence where they can assist access.
The objective is not to turn a garden into a fortress. It is to prevent a quiet, uninterrupted approach and to make the route out less convenient than the route in.
Lighting should be positioned carefully. A bright fitting that leaves the shed door in deep shadow may improve the appearance of the garden without improving security. Motion-sensitive lighting can be useful, but it should not be aimed at neighbours’ windows or arranged so that routine movement triggers it constantly. If it becomes a nuisance, it is likely to be disabled.
Mark, record and register what matters
Property marking does not stop a door being forced, but it can reduce the usefulness of stolen goods and make recovered property easier to identify. Mark bikes and tools with a method appropriate to their surfaces. Keep serial numbers, photographs, receipts and distinctive features in one place rather than assuming they can be reconstructed after a theft.
Photograph the bike with the frame number visible if possible. Record unusual scratches, accessories and modifications. For tools, note model numbers and battery identifiers. The information is useful for an insurance claim and for distinguishing your property from similar items offered for sale.
Marking should complement, not replace, a physical anchor. A thief may not know or care about the marking when entering the shed. The chain and anchor are what prevent the immediate loss.
It is also worth checking the insurance position before making changes. Some policies specify how bikes, tools or other equipment must be stored, and an external shed may be treated differently from the main house. The policy wording is the authority here; a lock that feels substantial is not necessarily the same as meeting an insurer’s storage requirement.
Keep the inside difficult to work in
Storage layout is part of security. Do not leave the bike directly beside the door, where it can be reached as soon as the latch is defeated. Secure it to the anchor with enough chain to use the frame but not so much that the chain lies in a large loose loop.
Store expensive power tools away from windows and avoid creating a single easily lifted box containing several high-value items. A toolbox with a lock is not a substitute for anchoring the tools or the box. If a thief can carry the entire container, the lock has only changed the shape of the problem.
Battery tools deserve particular attention because they are compact, valuable and easy to resell. Keep batteries and chargers with the main tools where practical, but do not mistake separation for security. The better arrangement is to secure the group to a fixed anchor or store it in a cabinet that is itself fixed to the building.
These upgrades do not need to be completed in one expensive project. A stronger gate, improved door fixings, a ground anchor and better records may be more valuable than a collection of small gadgets that all protect the same weak door.
Calculating your security budget: the 10% rule for peace of mind
A useful budgeting rule is to spend roughly a tenth of the value of the item on the physical security that protects it. It is not a law, and it should not be applied mechanically to every object in the shed. It is a way of avoiding the common mistake of protecting an expensive bike with whatever lock happens to be in a drawer.
For a valuable bike, the budget may need to cover more than one item: a suitable chain, a secure lock, a ground anchor and the fixings required to install it properly. The anchor may be the most important part of that package, but it cannot be separated from the chain, the lock and the building around it.
The same principle applies to tools. If several items are stored together, calculate the value of the group rather than choosing security based on the cheapest individual drill or saw. A thief sees a collection that can be carried away together. The security plan should account for that same total risk.
A practical budget can be divided according to the weakness it is addressing:
1. Start with the most valuable movable item. Secure the bike frame, not only a wheel, and attach it to a fixed point that can carry the load.
2. Repair the route through the door. Strengthen hinges, the hasp, the staple and any soft or split timber around them.
3. Deal with the route into the garden. A lockable gate and better visibility may prevent the shed from being approached unnoticed.
4. Protect the evidence of ownership. Record serial numbers, take photographs and keep receipts before anything goes missing.
5. Review the whole arrangement after installation. Pull the door, inspect the fixings and check that the chain cannot be reached or cut comfortably through a gap.
The 10% figure is best understood as a prompt to spend proportionately, not as a guarantee of peace of mind. A cheap item may not justify an elaborate installation, while a high-value bike or tool collection can make a properly fitted anchor look inexpensive. The cost also changes depending on the base: drilling into a sound concrete pad is a different job from reinforcing a deteriorated timber shed.
Do not spend the entire budget on the most visible component. A polished padlock on a rotten door is a poor allocation of money. Likewise, a strong anchor cannot compensate for a rear gate that is permanently left open or a window that provides an easier entry route.
For households in Cleethorpes, Grimsby and nearby parts of North East Lincolnshire, the best garden security upgrades are usually the ones that remove several weaknesses at once. A sound anchor limits what can be carried away. Better fixings make the door slower to defeat. A controlled route through the garden reduces privacy for anyone attempting the first attack. Records improve the chances of proving ownership later.
That is the practical lesson behind the hypothetical Cleethorpes bike. The ground anchor did not make the shed invulnerable and it did not need to. It changed the theft from a quick removal into a longer, noisier job. In outbuilding security, that difference is often the part that matters.